 |
| Photo by Marie Mack |
"Education is a natural process carried out by the human individual, and is acquired not by listening to words, but by experiences in the environment." ~ Maria Montessori
After much research, we decided it was time to take Samuel's letter recognition to the next level. He knows his alphabet and can recognize upper and lower case letters, but he is not able to identify the sounds of the letters. I love the alphabet boxes that you can research on the Internet, especially the two-part series on Counting Coconuts. We chose to model our own letter introduction process after what we have seen there and the suggestions on which order to present letters found on Living Montessori Now.
Take a look!
 |
| Photo by Marie Mack |
It seemed a little overwhelming to me to create an alphabet learning area for Samuel, but so far he has loved it! We decided to start with the letters in his name. He has heard the sounds from the letters of his name since birth and has an attachment of those letters as being his own. So why not start with something so important to him!
Living Montessori Now posted a very helpful guide for presenting sets of first starting letters. Coincidentally, the letters S A M appear in many of those sets. I also did some research on the Montessori Primary Guide website for some step-by-step instructions on how to present the letters as a lesson. The lesson advises starting with children around the age of 2.5 years old through 3.5 years old. We gathered many objects around our house which started with the same S sound as the word "sit." This made this project very cheap! Everything was already in our house.
In our blue tub we have: Sandpaper S's, Scuba Steve, stop sign, screwdriver, spoon, square, snake, scissors, socks, Stegosaurus, Spinosaurus (Samuel knows those dinosaurs by name), stickers, three-part cards for suitcase and sandwich, and, of course, Superman. We also added two books from the library on snakes and spiders.
We wanted to give Samuel examples of the sound S that he sees every day. We talked a lot throughout the week about everything we saw that started with the letter S. This lesson followed us to the grocery store, the park, the mall, and the library. While saying all the words that began with S, we overemphasized the SSSSS sound of the letter S. We made S the theme of the week with an emphasis on his name starting with the letter S.
 |
| Photo by Marie Mack |
To start our week, we worked on a very easy activity to really emphasize Samuel's name to him. I took construction paper and wrote his name with glue. Then pulled out some beans from my pantry and let him add them to the glue. (Interestingly, he put only one type of colored bean on each letter.) While I was writing his name he stated what each letter was. In the end, we read that all those letters put together said "Samuel"!
We did the same kind of activity with magnet letters on the refrigerator. We positioned the letters to spell his name any time we had a couple minutes of downtime. He would say each of the letters, then read his name. He is always amazed at seeing his name in letters!
 |
| Photo by Marie Mack |
One of our art projects this week used the scissors and stickers from our blue letter tub. We had practiced proper scissor etiquette with a lesson from Montessori Primary Guide and Sam was happy to remind me that "Scissors are sharp.", and that we have to be "Very, very careful." Typically, this skill can be taught to children around two years old. Language Planet Montessori also has some good information about this fine motor skill being an introduction to handwriting. Living Montessori Now has some free printables and more great articles on scissor usage.
 |
| Photo by Marie Mack |
While Samuel and I talked about the word stickers starting with the letter SSSS, he decided where to put his stickers on his pages. His cutting activity morphed into some tearing and some folding. The end product was completely his and he was excited to present it to his Dad when he returned home from work!
Throughout the week we talked about the other objects in our tub, read our books, and traced the sandpaper letters. Samuel often wandered over to the box, pulled something out and talked about the name of the object and fact that the name started with the letter S. Happy Momma!!
 |
| Photo by Marie Mack |
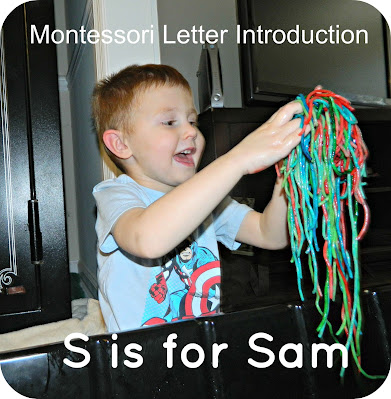
We made a colored spaghetti sensory bin to finish up our S week.
To make the colored spaghetti we used three boxes of spaghetti, vegetable oil, and food coloring. We cooked the spaghetti with vegetable oil until al dente. Once it cooled, we moved a portion of the spaghetti to a large bowl and let Samuel add in some food coloring. He used a spoon to mix in the food coloring, but we found it was better to add a couple tablespoons more oil and mix it with our hands. Using extra oil allows the oil to attach the coloring to the spaghetti and not to your hands. (I did have blue hands during this activity!) The color covered the spaghetti completely with some good hand mixing. The more color you add the brighter the spaghetti will turn out. We went through the same process for the other two colors we used.
We put all the colored spaghetti in our big black bin and mixed them all together. (We found this very useful black bin at Lowe's Home Improvement in the concrete section for $13. It has been used in a myriad of ways in our home!) Then we added in some objects for Samuel to find. Our objects were: spoon, strainer, Scuba Steve, scoop, and snake.
 |
| Photo by Marie Mack |
 |
| Photo by Marie Mack |
Of course, Avalyn wanted to try out the sensory bin too. She loved the spaghetti, but didn't like it being cold!
Learning using hands-on activities is what Montessori is all about. I'm confident Samuel will pick up on the sounds of the letters like he has with recognizing the letters by sight.
We plan on moving through the rest of his name using this same kind of "Letter of the Week" technique. Once we are finished with his name we will go to the next set of letters suggested on the Living Montessori Now post. Enjoy! ~Marie Mack
This original post was published in March of 2013 (at Montessori on a Budget). We LOVE sensory activities and this spaghetti activity has spurred many other sensory activities in our home. ~ Marie
Linking up with Montessori Monday!


